Basic Materials, Tools, and Supplies

Starting out
Don't be afraid of making mistakes. Fuck the critics.
Try not to get sucked in to buying all the cool tools and products. It's fun to and some are kind of neat, but they're all too expensive and most you'll break or never use.
Develop your own style but note and learn from how others
Scale
Develop your own style! I have an acquaintance who made buildings.
They were all distorted looking and not the right scale, the windows and doors all slightly skewed. They look like 3-dimensional, well drawn cartoons.
They were great and eBayers paid a high price for them.
If it looks good, you did it right.
I have extra men to hold up against things for scale checking, some times I just use a stick broken off at the right height to judge window and door heights or to see if the particular tree is going to look okay.
What will make your scene look good is a variety of textures, shapes and sizes.
I like to try and keep my doors and windows the same size in for each building. And if you are making several of the same type, i.e. a chateau or farm setting, keep them consistent. i.e. If you are making brick buildings in a town, more than likely they would of come from the same maker and will all be the same size.
Scales can be given as a ratio or a fraction (i.e., 1:64 or 1/64). In this case 1mm on the miniature equals 64mm on the original. Some scales (like GW) are listed as a certain height, ( 25mm, 28mm and 54mm are the most common ones)
Unfortunately none of the manufacturers can get there act together to standardize the scale. Some measure to the eye level and some measure to the top of the head. Fantasy and sci-fi ones also throw a wrinkle into the mixture.
Usually, height scales measure to "eye height" while ratio scales measure to "head height"
SCALE |
DESCRIPTION |
EQUIVALENT TO |
1/107 |
Old school war gaming! Used for fantasy, science fiction, and some of the new WWII games |
15mm |
1/87 |
Lots of railroad, scenery, and armor models available in this scale.
Same as model railroad HO scale. |
18.5mm |
1/80.5 |
Some skirmish type war gaming and science fiction |
20mm |
1/76 |
Plastic miniatures and kits of aircraft, vehicles, and soldiers are available.
Same as OO scale. |
22.4mm |
1/72 |
As above, though a slight bit larger (worn moulds or?) |
22.4mm |
1/64 |
Popular for fantasy, historical, skirmish, science fiction, and role-playing games.
Same as railroad S gauge. |
25mm |
1/58 |
Heroic and/or the larger 25mm figures |
28mm |
1/54 |
Confrontation miniatures, as close as you can call for a mythical figure |
30mm |
1/48 |
Most popular scale for plastic aircraft kits. Some display figures available in this scale |
33.5mm |
1/43 |
O scale in railroads |
37mm |
1/35 |
Popular scale for plastic kits (especially armor) |
50mm |
1/30 |
Toy soldier scale |
54mm |
|
|
|
Materials and Tools (Foams)
On finding high-density foam yourself - Home Depot, Rona, or most well stocked building supply stores. They use it in insulating.
The pink stuff most commonly used is called - FOAMULAR® rigid foam insulation (made by Owens Corning). It is also called - Cel-Lok® Rigid Extruded Polystyrene. The blue stuff most commonly used is called - STYROSPAN™ extruded polystyrene insulation (made by DOW). The white styrofoam sheets I use for build up only; mind you, ...sometimes that foam packing on your new whatever comes out in very usable shapes.
Expanding Foams - these come in different expansion rates; I use a low expanding, paintable type. WEAR GLOVES. There is a two-part pour type that comes in harder densities too (I haven't tried it yet due to the trouble with getting some here)
Basically, I reuse recyclable materials. I do buy WeldBond (a good quality white bond glue will work, just not as good) I use dollar store 8-in-a-set bristle paint brushes and their acrylic paints and from whomever has it the cheapest, Clearcoat clear matte spray, acrylic caulking (brown & grey), 3M spray glue for foam, 1/2" and 1" pink foam, and 4x8 sheets of 1/8" hardboard.
For tools: a regular and a narrow Olfa knife, a wood rasp or two, a pull saw and coping saw. Masks, disposable gloves, bulk 1" paint brushes. Everything else you acquire over time and hardly use.
The Base Section
The size of the piece you are making will determine how 'thick' the base needs to be. Some pieces really do not need a base and if you are unsure as to whether or not it is going to become part of a larger project or if you are going to permanently place it on your board or diorama, (glue it down), then do not add a base yet; this applies more to things like hills, walls, and buildings.
- The best stuff I have found to use is 'hardboard'. You can buy it in 1/8" and 1/4" thicknesses and it comes in 4ft X 8ft sheets.
- 1/4" is best for larger bases; over 18".
- 1/8" for everything else.
- Foamboard does not work very well unless it is coated thoroughly with a hard coating, (glue and paint mix will work)
- Pressboard and poster paper will work if you are covering the bottom of a hill or wall section. But, I would still use the 1/8" hardboard or just leave it so I could add it on later or use the piece later in something else.
Cutting and Shaping the Base I have always used an old $20 jigsaw. A coping saw works great for adjustments and you can also cut out the piece with it if you want, (they are cheap $2-$10). Power tools are great, I do not have a bandsaw, (if I get one it will be an old butchers bandsaw - more useful for terrain making), I have a scroll saw which is great for small pieces. I would like to try one of those spiral hole cutters again. This time with a good bit on it. The hardboard is very tough stuff.
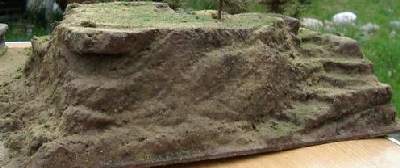
After I have cut out my base section, I will taper the edge, (feather it down to the table). A wood rasp works well for this, I also use a wood shaver, (which has turned into a handy tool), I picked it up at the hardware store for $5.
Individual Movable Hills
And as we were talking about stackability. These are what the top piece of your stacking set would look like. Usually the piece they are being stacked on will have a pond or a crater hole that this top hill section covers up.
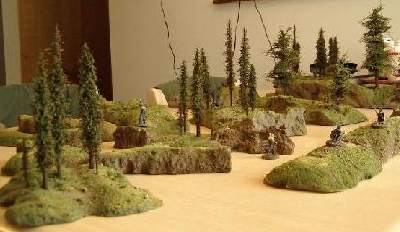
The hills above are made from high-density foam, (no base attached- just glued on a poster board and cut), the ones below here are made from a small piece of foam glued on hardboard, (so I can poke the tree into the hill), with plaster (sculptamold) built up around it.

 I try to put another way up the hills too. Kind of a secret trail from the back side. Makes for more variations in the game. Notice how the undercuts and cliff faces "do not have green flocking". And when it does it is only on the "top" faces of the ledges. (when adding it it is dropped straight down while the terrain piece is flat) Gives it all a more natural effect.
Flockings and Water effects
I do use a fair amount of Woodland Scenics products; specifically their flockings, foilage, and water effects.
The plastic stained glass effects from the dollar stores or Walmart is great for liquids too.
Waterfalls - Silicone and clear plastic strips
Stick the strips of plastic to the top of the waterfall. Clear plastic from the silicone package works, actually any clear plastic. (It is easier to have a ledge that the water falls from for this method.)
Then coat the strips with the clear silicone.
Don't try to put to much on at once. You'll need to let it dry over night and then add another coat.
ALSO, ya need to do this in the garage, outside in the carport, or ...a well ventilated area. This stuff stinks and I'd say toxic.
Low Cost (readily available ater making materials)
- White glue (Weldbond brand dries perfectly clear)
- Clear silicone (stinks - use ventilation)
- Plaster and paint with a gloss finish
- mirror or high polished metal
- clear plastic film
- window cling paints (can be found in a dollar store)
Top of Page
Building the Building
 Same as for the castles
Castles
There are many methods of building walls. It will depend on what you are using them for as to what you should use. Also, different materials are used for different scales and depending on how detailed you want them.
I use the high-density pink foam for a lot of my building. You can cut or carve a lot of detail into it. The blue is okay but being slightly softer it is not as easy to do fine details.
If I am making something very small I will use the white plastic sheet stuff that model railroaders use. You can buy it in large 4ft by 8ft sheets which makes it affordable. If I am making something like the little 15mm building in this picture I will use the 1/4" foam poster board.
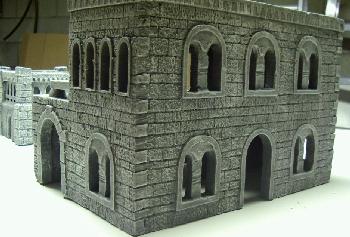
Castle Walls
Here is the way to make simple brick or stone walls. I use this method the most. It takes time but the result is nice. Once you have made an entire castle this way you will understand why people want so much for them.
The Big Secret
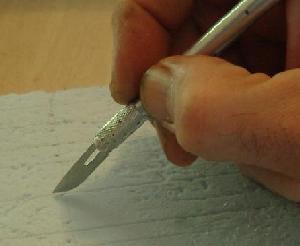
Cut then make (go over the line with a dull pencil)

Basically that is how I make rock and brick walls.
Cut your lines with the knife then go over the lines with a dull pencil to deepen the grout lines.

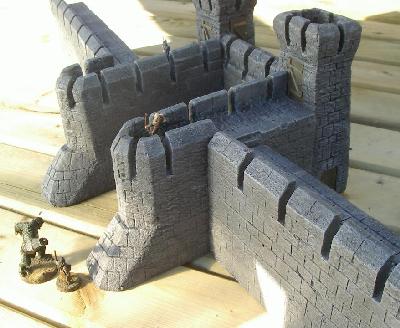
 Carve out and shape your walls with a saw and coarse wood rasp. Then do the rock work. That way if the piece you are building is sectional, like this one, you can fit them together and match the grout lines on each piece as you make them. This will help hide the joints between the pieces.
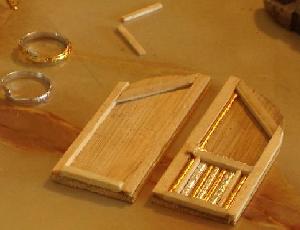
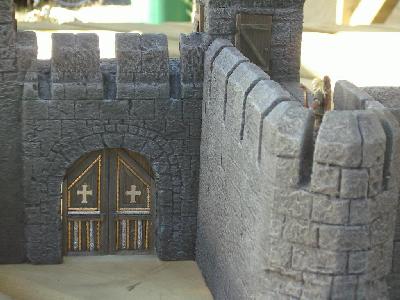
I like to cut out the small wooden doorways a little so that the door will fit into the wall not just stuck to it.  Make your doors first of course. I use a thin wood stock, (tongue depressors work good), and carve in the 'boards' with the back of my hobby knife.
If you want to get fancy, you can add paper hinges and cross boards or, like for the main gate on this piece, add things like hammered out toy rings and cut outs. Check your local dollar store out for party favours. I use the rings for various things.

Back to the walls... As mentioned embed the doors into the wall a little, it will look better.


Simple cut, chip, and scrape until they fit. Don't worry to much about chips and marks in the foam as they will just add to the detail. For extra detail in the stone you can take a small coarse rock and press various bricks in and put marks on others.

Once you have it cut out and the bricks carved in, goop it, let it dry and add paint.
Larger View
Larger View


